
I decided to build my first quadricopter (named 4ld): in these blog posts you can follow step-by-step the build log and (hopefully ;)) the flights. I’m not really an expert: you can learn with me reading my posts!
Introduction
A multirotor is a flying radio controlled model that flies using two or more motors. I’m not going to explain here the theory behind: on Internet you may find very good sites that explains in detail the Bernulli’s principle… for my italian friends, I strongly suggest the reading of the document Multirotori 101, written and constantly updated by the users of the BaroneRosso website.

Different configurations are available: trirotors (with 3 motors and 3 propellers), quadrirotors (4 motors and 4 propellers) and so on… the position of the motors and the shape of the multirotor may also different from model to model.
On the market you can find ready-to-fly (RTF) models or buy the different components needed to build one… being a maker, I chose the latter option.
Components
A multirotor is made at least by the following elements:
[checklist]
- the frame, that is the platform (made by plastic, carbon fiber, wood…) that supports the other elements
- the propellers, that move the air and make the multirotor fly
- the motors, that spin the propellers
- the ESC (electronic speed control), electronic circuits that control the motors
- a flight control board, the electronic board that is the “brain” of the multirotor… the simplest control boards receive the commands from the user and translate them for the ESC; the more advanced ones stabilize the multirotor using different sensors and can also do unattended flights thanks to the GPS
- the radio, made by the transmitter in the hand of the user and the receiver on the multirotor and connected to the control board
- the battery that provides energy to the different components
[/checklist]
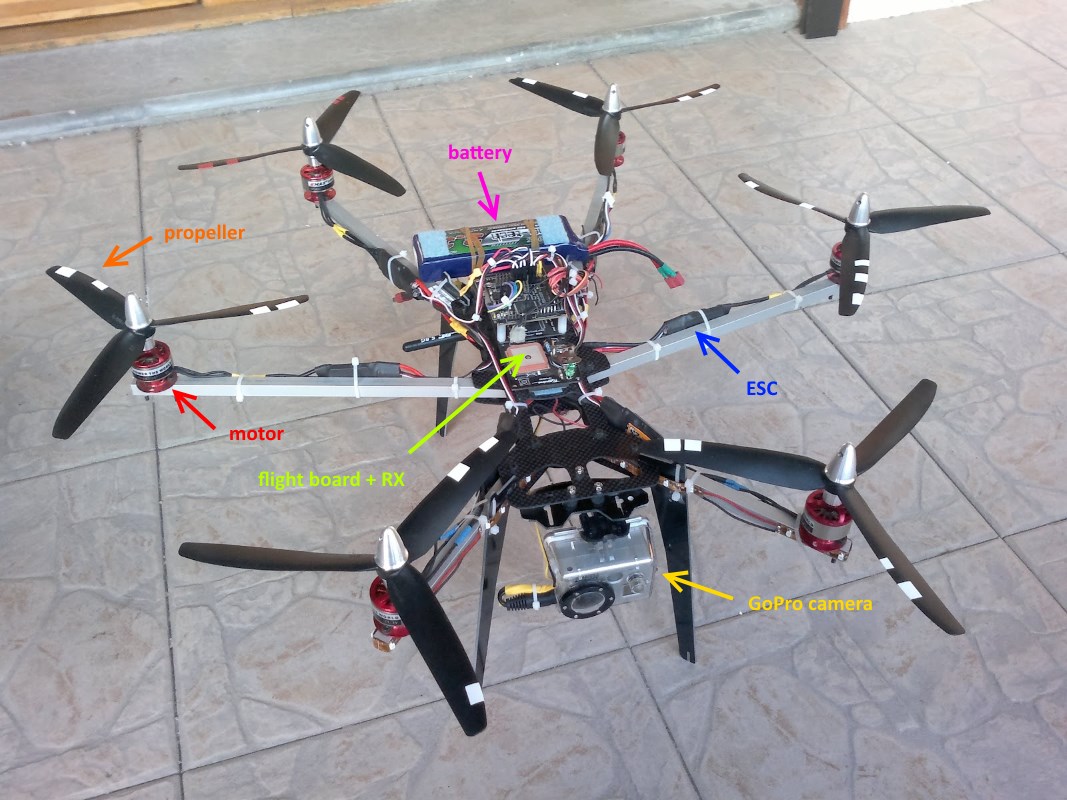
Other components can be added like telemetry circuits, cameras (for example the famous GoPro) with gimbals for stabilization, first-person vision (FPV) systems…
Shopping cart

Here are the components for my quadricopter:
- Black Quadrotor KIT fromRCTimer
The kit includes frame, ESCs, motors and propellers to build a 450 “class” quadricopter (450 is the distance in mm between two opposite motors). The frame is a clone of the widely-used Flame Wheel 450 by DJI.
- Turnigy 9X Mode2 from HobbyKing
9 channel transmitter and 8 channel receiver kit, cheap and very suggested for hobbistic use. Mode2 is about how the sticks are configured (to simplify, the throttle is on the left, similar to the rc cars).
- Flight control Naza-M Lite con GPS
Even if a lot of opensource solutions are available to control multirotors, I preferred to start with a commercial control board.
As soon as the items arrive, I’ll be able to start the building… stay tuned!


Grande lucaa,a breve acquistero anche io tutto il materiale per construirne uno.
Ciao! Complimenti per l’iniziativa, non vedo l’ora di seguire i tuoi progressi !
Ciao e grazie mille.
Luca
Bravissimo Luca! Ti seguo volentieri, i tuoi tutorial sono come sempre chiarissimi! In Internet cercavo un tutorial sull’ autocostruzione di un drone, ma sono tutti confusi e incompleti.
Stai facendo un grandissimo lavoro! Anch’io come te sono un gran appassionato di Arduino, piattaforma fantastica
Ciao
Luca