
After having published my post about how to implement a webserver on the esp32 chip, some readers correctly warned me that everyone, once connected to the wifi network, could control the relay and asked me how to limit access to the webpage.
A classic solution (that I also used in this previous tutorial) is to ask the user to enter a password. It’s very easy to implement, but has a negative aspect, that is you have to type the password everytime you need to switch the relay.

Today I’ll show you how to protect your website using a feature of the SSL/TLS protocol: the mutual authentication.
Mutual authentication
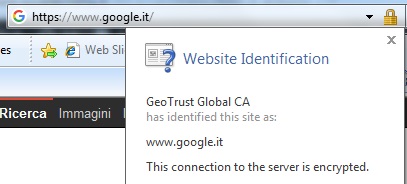
Everytime you connect to a website using the https protocol, the server which hosts the site sends to your browser the SSL certificate of the site. Thanks to this certificate, you can verify the identity of the server and establish a protected connection to it:
The TLS protocol also offers the possibility for the server to require a certificate from the client: this means a two-way authentication, that is server and client authenticates each other using SSL certificates:

With this authentication method, a user has only to install on his device the client certificate (and the corresponding private key) and choose which certificate to send to the server if more than one is present:

The authentication with SSL certificates is therefore based on the principle of something I own (for example, a key) and not of something I know (for example, a password).
Certificates
Generally speaking, SSL certificates can be:
[checklist]
- self-signed
- signed by a Certification Authority
[/checklist]
The first ones are perfect for internal use or for testing, while the second ones, normally signed by trusted CAs, are widely used in production environments or on the Internet. Sometimes you probably received this warning message when surfing on the Internet:

that means that your browser doesn’t trust the certificate sent by the server because it’s self-signed or signed by a non trusted CA.
For this tutorial, I’m going to use OpenSSL as a certification authority to create the certificates we need. If you’re using the toolchain provided by Espressif, you don’t need to install anything else because OpenSSL is included.
First create a folder that will contains all the files required by OpenSSL to operate as a CA in your home directory:
cd mkdir myCA |
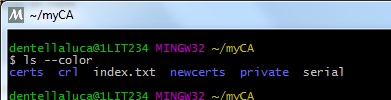
Now move into that folder and create some empty files:
cd myCA mkdir csr certs crl newcerts private touch index.txt echo 1000 > serial |
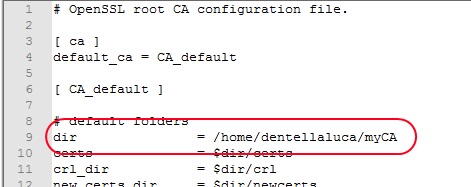
Copy the certification authority‘s configuration file (openssl.cnf) from my Github repository into the myCA folder. Open the file and change the main path accordingly to your system:
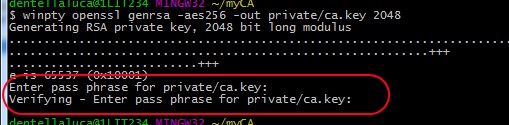
Now you have to generate the private key and the certificate for the CA. Let’s start with the key (its length will be 2048bit, enough to ensure good security):
winpty openssl genrsa -aes256 -out private/ca.key 2048 |
(all the commands must start with winpty only if you’re using Windows!)
You’re prompted for a password; it’s very important to remember it because you’ll have to type it everytime you use the CA:
Now generate the CA certificate (with a duration of 3650 days, that is 10 years):
winpty openssl req -config openssl.cnf -key private/ca.key -new -x509 -days 3650 -sha256 -extensions ca_cert -out certs/ca.cer |
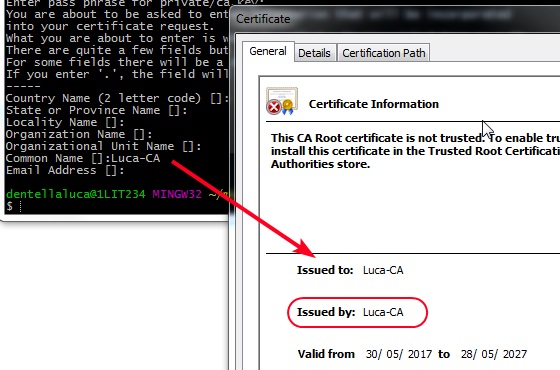
You have to enter some informations… the only mandatory is the common name which is the name of the CA, that will be included in all the certificates the CA will sign. At the end of the process you can open the file (ca.cer) and verify name and duration:
Let’s now generate the server and client certificates. The steps are the same for both:
[checklist]
- generate a new private key – openssl genrsa
- generate the CSR (Certificate Signing Request) file – openssl req
- sign the CSR file with the CA to obtain the final certificate – openssl ca
[/checklist]
Server certificate:
winpty openssl genrsa -out private/esp-server.key 2048 winpty openssl req -config openssl.cnf -key private/espserver.key -new -sha256 -out csr/espserver.csr winpty openssl ca -config openssl.cnf -extensions server_cert -days 365 -notext -md sha256 -in csr/espserver.csr -out certs/espserver.cer |
Client certificate:
winpty openssl genrsa -out private/esp-user.key 2048 winpty openssl req -config openssl.cnf -key private/esp-user.key -new -sha256 -out csr/esp-user.csr winpty openssl ca -config openssl.cnf -extensions usr_cert -days 365 -notext -md sha256 -in csr/esp-user.csr -out certs/esp-user.cer |
As said before, the client device must own both the certificate and the private key. You can merge certificate and key in a single p12 (or pfx) file with the following command:
winpty openssl pkcs12 -export -out esp-user.pfx -inkey private/esp-user.key -in certs/esp-user.cer |
The way you install the P12 file on your device depends on the specific operating system it runs: on Windows you only need to double-click the file and follow the import wizard.
SSL webserver
The source code for the program running on the esp32 devboard is available in my Github repository.
First you have to copy in the prioject folder the certificates (CA and server ones) and the private key for the server certificate and include them – as text data – in the program (I’ve already explained how to include binary files in my previous post):

To implement the SSL protocol I’m using the mbedTLS library, included in the esp framework.
First include all the required header files:
#include "mbedtls/platform.h" #include "mbedtls/net.h" #include "mbedtls/ssl.h" #include "mbedtls/entropy.h" #include "mbedtls/ctr_drbg.h" #include "mbedtls/debug.h" #include "mbedtls/error.h" |
Before being able to accept SSL connections, you have to define and initialize all the variables you’re going to use:
// mbed TLS variables mbedtls_ssl_config conf; mbedtls_ssl_context ssl; mbedtls_net_context listen_fd, client_fd; mbedtls_entropy_context entropy; mbedtls_ctr_drbg_context ctr_drbg; mbedtls_x509_crt srvcert; mbedtls_x509_crt cachain; mbedtls_pk_context pkey; [...] // initialize mbedTLS components mbedtls_net_init(&listen_fd); mbedtls_net_init(&client_fd); mbedtls_ssl_config_init(&conf); mbedtls_ctr_drbg_init(&ctr_drbg); mbedtls_entropy_init(&entropy); mbedtls_x509_crt_init(&srvcert); mbedtls_x509_crt_init(&cachain); mbedtls_pk_init(&pkey); |
Now parse the certificates and the private key and store them in the variables:
mbedtls_x509_crt_parse(&cachain, ca_cer_start, ca_cer_end - ca_cer_start); mbedtls_x509_crt_parse(&srvcert, espserver_cer_start, espserver_cer_end - espserver_cer_start); mbedtls_pk_parse_key(&pkey, espserver_key_start, espserver_key_end - espserver_key_start, NULL, 0); |
Tell the library which variables to use for CA chain and own certificate and require the mutual authentication (MBEDTLS_SSL_VERIFY_REQUIRED):
mbedtls_ssl_conf_ca_chain(&conf, &cachain, NULL); mbedtls_ssl_conf_own_cert(&conf, &srvcert, &pkey); mbedtls_ssl_conf_authmode(&conf, MBEDTLS_SSL_VERIFY_REQUIRED); |
After having configured other elements of the library (the random number generator and the debug function) you can bind it to the standard TCP port for the https protocol (443) and accept new incoming connections:
mbedtls_net_bind(&listen_fd, NULL, "443", MBEDTLS_NET_PROTO_TCP); mbedtls_net_accept(&listen_fd, &client_fd, NULL, 0, NULL); |
After having accepted a connection, you only have to call the function:
mbedtls_ssl_handshake(&ssl); |
during the handshake process the library sends to the client its own certificate and require the one from the client, verifying that this is signed by the specified CA: the mutual authentication is implemented!
After the handshake, the program is similar to the previous example, you only have to use mbedTLS specific send/receive functions (mbedtls_ssl_read e mbedtls_ssl_write).


Ciao Luca
ho un problema di riavvio continuo su questo esempio. Il trap avviene in:
HTTPS Server starting…
– Wifi interface configured
– DHCP server started
I (182) system_api: Base MAC address is not set, read default base MAC address from BLK0 of EFUSE
I (182) system_api: Base MAC address is not set, read default base MAC address from BLK0 of EFUSE
ESP_ERROR_CHECK failed: esp_err_t 0xb at 0x40107b0f
0x40107b0f: ap_setup at /home/orcim/esp/_work/_luca_dentella/esp32-tutorial/15_ssl_webserver/firmware/main/./main.c:355 (discriminator 1)
file: “/home/orcim/esp/_work/_luca_dentella/esp32-tutorial/15_ssl_webserver/firmware/main/./main.c” line 355
func: ap_setup
expression: esp_wifi_set_config(WIFI_IF_AP, &ap_config)
Ciao Loris, normalmente quando va in errore il metodo
esp_wifi_set_configsignifica che qualche parametro è errato. Controlla ad esempio la password, spesso non è sufficientemente lunga per l’algoritmo (WPA…) scelto.Ciao Luca,
complimenti per i tutorials.
Volevo solo segnalare che in questo esempio, il nome da utilizzare per creare il certificato del server deve essere “espserver” e non “esp-server”
altrimenti il sistema genera errore quando tenta d’importare il file.
grazie sistemo il refuso!
Ciao Luca,
se mi connetto direttamente all’AP dell’ESP32 funziona perfettamente ma se tento di accedere attraverso un router wifi, a cui sia il PC che l’ESP32 sono connessi, non funziona.
Con il server web http invece non ci sono problemi.
Sbaglio qualcosa?
Grazie mille.
ciao, molto strano… i test che ho effettuato erano proprio con l’esp32 in STAtion mode.
Ciao, ho risolto: era un mio problema di quantità di RAM allocata dell’ESP32.
Grazie mille.
Ciao!
ciao Luca,
alla firma dei CSR sia server che client ho questo messaggio:
Using configuration from openssl.cnf
Error opening CA private key /home/claud/myCA/private/ca.key
3228:error:02001003:system library:fopen:No such process:bss_file.c:406:fopen(‘/
home/claud/myCA/private/ca.key’,’rb’)
3228:error:20074002:BIO routines:FILE_CTRL:system lib:bss_file.c:408:
unable to load CA private key
ciao, sembra ci sia qualche errore nel setup della tua CA, guarda questa guida di RH
OK, rifatto da zero.la firma del certificato server va bene:
Sign the certificate? [y/n]:y
1 out of 1 certificate requests certified, commit? [y/n]y
Write out database with 1 new entries
Data Base Updated
Ma quando firmo il Client mi da:
Sign the certificate? [y/n]:y
failed to update database
TXT_DB error number 2
quell’errore normalmente indica che stai generando due certificati con gli stessi parametri
Grazie risolto, dai disegni non era visibile e sto iniziando ora con questo ambiente di sviluppo.
Due curiosità: all’inizio usi la shell mingw32, ma dopo installato esp-idf sei nella shell MSYS.
aprendo la shell MSYS, per i certificati tutto ok, ma se faccio make, mi dice: esp-idf build system only supports MSYS2 in “MINGW32” mode.
Altra curiosità: in un successivo articolo spieghi la creazione di un certificato, ma la sintassi è leggermente diversa. E’ migliore di questa?
ancora Grazie
Hi
I’m getting the same error message as Claudio did originally but my Italian is not good enough to properly understand the solution.
Also, I notice that the extra hyphen is still shown in the “winpty openssl genrsa -out private/esp-server.key 2048” line that Steve mentioned.
Ciao Luca,
sfrutto questo post per chiedere qualcosa di simile. Ho la necessità di leggere tramite javascript il contenuto di un file per un webserver. Il file in questione dovrebbe essere aggiornato con la lettura di un sensore in modo tale da poter visualizzare ogni volta il valore letto senza la necessità di ricaricare la pagina web del webserver. Con lo spiffs è possibile far ciò? grazie
ciao Rossella! La cosa è ancora più facile: tramite Javascript puoi fare una chiamata al tuo webserver (tipo “dammi il valore del sensore”) e aggiornare solo un elemento della pagina senza doverla ricaricare tutta. Se quindi scheduli la tua chiamata ogni tot secondi, ecco che hai risolto. E’ così che funzionano i siti “AJAX”, guarda ad esempio il mio progetto ESP32Lights, faccio così per aggiornare il valore del sensore di luminosità ogni 5 secondi.
Si, ho già visto il tuo esempio, ma nel mio caso sto utilizzando un webserver https, tramite openssl. Cambia qualcosa?
Grazie
ciao, no non cambia nulla… jQuery può tranquillamente interrogare anche un webservice in https.
Ciao Luca,
complimenti per i tuoi articoli.
Sto provando a connettere un Sonoff con una ESP8266 ad un broker mqtt che richiede la mutua autenticazione. Ho sia il certificato client che quello server.
Posso comunque utilizzare la libreria mbedTLS per potermi collegare?
Grazie
ciao Silvio, purtroppo non saprei dirti per l’esp8266, questi tutorial sono per l’esp32 che ha un diverso framework…