
Uno dei progetti più popolari tra quelli inclusi nel mio tutorial sul chip enc28j60 è sicuramente WebRelay. Tale progetto consente di attivare una uscita di Arduino tramite una semplice pagina web, accessibile anche da smartphone. Oggi vedremo come eseguire WebRelay con il chip esp32; sarà l’occasione per spiegarvi come realizzare un server TCP, in particolare un web server.
Netconn API
Come ormai sapete, il framework esp-idf utilizza la libreria lwip per gestire le comunicazioni di rete. Questa libreria offre diversi livelli di astrazione: il programmatore può decidere di gestire nel proprio programma i pacchetti grezzi (raw) oppure di utilizzare componenti già pronti.
Per realizzare il nostro server TCP, utilizzeremo proprio uno di questi componenti già pronti: le Netconn API.
Il suo utilizzo per realizzare un server è molto semplice ed è schematizzato nei seguenti passi:

Il metodo netconn_new() crea una nuova connessione, restituendo un puntatore a struct netconn che rappresenta la nuova connessione:
struct netconn *conn; conn = netconn_new(NETCONN_TCP); |
Il parametro passato al metodo indica il tipo di connessione… quelli più comuni sono NETCONN_TCP per una connessione con protocollo TCP e NETCONN_UDP per una con protocollo UDP.
Per utilizzare la connessione in modalità server dobbiamo quindi associarla (bind) ad una specifica porta… ad esempio un server web normalmente è in ascolto sulla porta 80 (443 se in HTTPS):
netconn_bind(conn, NULL, 80); |
Il secondo parametro del metodo (NULL sopra) consente di associare la connessione anche ad uno specifico indirizzo IP e può essere utile nel caso il dispositivo abbia più interfacce di rete. Utilizzando NULL (o l’equivalente IP_ADDR_ANY) si chiede alla libreria di effettuare il bind su ogni interfaccia disponibile.
Infine possiamo mettere il programma in ascolto con il metodo listen:
netconn_listen(conn); |
Gestiamo una nuova connessione
Utilizzando il metodo netconn_accept() il nostro programma può accettare una nuova connessione in ingresso:
struct netconn *newconn; netconn_accept(conn, &newconn); |
Il metodo restituisce un puntatore ad una nuova struct netconn che rappresenta la connessione stabilita con il client. Questo metodo è bloccante: il programma si ferma finché un client non effettua una richiesta di connessione.
Una volta stabilita la connessione, è possibile utilizzare i metodi netconn_recv() e netconn_write() per ricevere o inviare dati al client:
netconn_recv(struct netconn* aNetConn, struct netbuf** aNetBuf ); netconn_write(struct netconn* aNetConn, const void* aData, size_t aSize, u8_t aApiFlags); |
Il metodo netconn_recv(), per ottimizzare l’utilizzo della memoria RAM, gestisce i dati tramite un buffer interno (modalità zero-copy). Per poter accedere ai dati ricevuti è quindi necessario:
- dichiarare una variabile come puntatore a struct netbuf
- passare l’indirizzo di tale puntatore come secondo parametro
- utilizzare il metodo netbuf_data() per ottenere un puntatore ai dati all’interno del netbuffer e la loro lunghezza
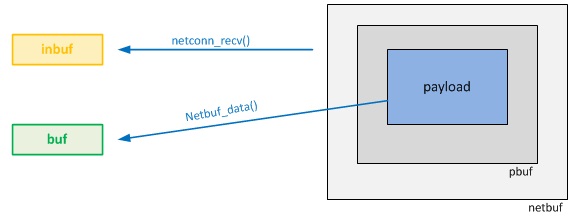
struct netbuf *inbuf; char *buf; u16_t buflen; netconn_recv(conn, &inbuf); netbuf_data(inbuf, (void**)&buf, &buflen); |
Similmente il metodo netconn_write() accetta, come ultimo parametro, un flag per indicare se copiare o meno il contenuto del buffer prima di effettuare l’invio. Per risparmiare memoria è quindi possibile, se si ha la sicurezza che tale buffer non sia alterato da altri thread, indicare come flag NETCONN_NOCOPY:
netconn_write(conn, outbuff, sizeof(outbuff), NETCONN_NOCOPY); |
Al termine del dialogo con il client, la connessione può essere chiusa e il buffer liberato:
netconn_close(conn); netbuf_delete(inbuf); |
HTTP server
Quanto abbiamo visto finora, può essere applicato ad un qualsiasi server TCP. Se vogliamo dialogare con un browser Internet dobbiamo “parlare” la stessa lingua, ovvero il protocollo HTTP.
Nel programma di esempio (disponibile su Github) ho quindi implementato una versione minimale di tale protocollo. Quando digitiamo nel browser un indirizzo Internet (es. www.google.com), il browser si collega al server di Google e invia una richiesta nella forma
GET <resource> [...] |
La richiesta può avere diversi campi ma la prima riga contiene sempre il nome della risorsa (pagina, immagine…) che si vuole ottenere. In particolare se si accede alla homepage del sito, la richiesta sarà sempicemente GET /.
Il sito pubblicato da esp32 per controllare il relay è composto da solo due pagine:
- off.html, visualizzata quando il relay è spento
- on.html, visualizzata quando il relay è acceso
Ogni pagina contiene una scritta (“Relay is ON|OFF“) e una immagine. L’immagine contiene un link all’altra pagina e cliccandola viene anche cambiato lo stato del relay:

Il programma identifica la risorsa richiesta verificando il contenuto della richiesta con strstr():
char *first_line = strtok(buf, "\n"); if(strstr(first_line, "GET / ")) [...] else if(strstr(first_line, "GET /on.html ")) [...] else if(strstr(first_line, "GET /on.png ")) [...] |
Un server HTTP risponde al browser indicando per prima cosa l’esito della richiesta. Se è ok, il codice inviato è 200:
HTTP/1.1 200 OK |
quindi indica il media type della risorsa richiesta e infine invia la risorsa. In questo esempio, gli unici media type possibili sono:
[checklist]
- text/html per le pagine HTML
- image/png per le immagini
[/checklist]
Contenuto statico
Un server web normalmente memorizza le risorse che compongono il sito pubblicato su un supporto esterno (memory card, disco fisso…). In casi molto semplici è possibile anche includere tutto il contenuto all’interno del programma.
In particolare nell’esempio proposto le pagine HTML e le stringhe di risposta del protocollo HTTP sono incluse come array statici:
const static char http_html_hdr[] = "HTTP/1.1 200 OK\nContent-type: text/html\n\n"; const static char http_png_hdr[] = "HTTP/1.1 200 OK\nContent-type: image/png\n\n"; const static char http_off_hml[] = ""; |
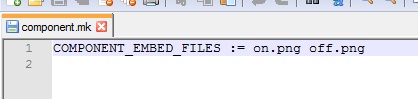
Per includere anche le immagini, ho sfruttato una funzionalità del framework (embedding binary data). E’ possibile indicare nel file component.mk i files da includere:
All’interno del programma è possibile accedere al contenuto dei files embedded tramite appositi puntatori:
extern const uint8_t on_png_start[] asm("_binary_on_png_start"); extern const uint8_t on_png_end[] asm("_binary_on_png_end"); extern const uint8_t off_png_start[] asm("_binary_off_png_start"); extern const uint8_t off_png_end[] asm("_binary_off_png_end"); |
la sintassi è sempre _binary_filename_start|end, sostituendo il “.” con “_” nel nome del file. Avendo a disposizione i due puntatori (start ed end) è facile inviare l’intero contenuto del file con il metodo netconn_write() già spiegato:
netconn_write(conn, on_png_start, on_png_end - on_png_start, NETCONN_NOCOPY); |
Demo
sottotitoli in italiano disponibili


Luca,
Great article. Thank you for your time, your generosity and the help that it gives. I have been trying to find an example that shows a web server serving a html file from memory. I would like to be able to serve a large SPA file like ReactJS from a SD memory card. Is that possible?
Hi John, yes it’s possible and I’m working on it! You may also consider (this will be the topic of a future post) to use a partition (FAT or SPIFFS) in the internal flash.
Hi Luca,
You publish really great tutorials! Thanks. Regarding the webserver – is there a simple way how to get user input from the web (e.g. to retrieve content from a web form submitted). I am thinking about something like a “simple admin web console” to set-up / administer SSID, user credentials … where text input is necessary.
Thanks in advance
Marek
Hi Marek, yes it’s quite easy to receive (GET or POST methods) data from the user… you only need to parse the incoming request: GET parameters are added to the URL while POST parameters are added in the request body. One of my future tutorials will be about this!
Hi Luca,
Thanks for the answer. One more thing regarding your demo – the web server is working perfectly fine when connected from android (e.g. from mobile phone), but since I connect from Windows (e.g. notebook running Win10) the pictures downloading is extremely slow (and in some cases even stops the web server on ESP32 to listen to requests and respond) – tested on 2 different Windows devices. Any idea what could be the problem (BTW – without the images it works fine even on Windows)?
Thanks in advance
Marek
It’s working really really well. I could not believe a http server was running on my ESP.
The keyword “static” makes my compile fail though (Cygwin GCC, ESP SDK 2.1) –I am not entirely sure why.
Hi Luca,
Thanks for all your work, this are really great tutorials. I’m trying to do a merge between two of them, the Access Point (18) and Webserver (20). I’ve tried some times, but it didn’t work. Do you have any example or material that may help me to configure it?
Thanks.
Hi Héber, it’s strange… the two elements should work fine: could you share your code and/or any errors?
I’ve already find a way to make it work. thanks a lot.
Hello Luca,
Which relay did you used on this project?
I have 5v jqc-3ff-s-z relay but it did not work.
Thank you.
My mistake was connecting relay from 5v pin-out
Correct way was use relay’s vcc in 3.3v pin-out.
confirm, the esp32 pins run at 3.3V
Luca,
Can you please provide a sample to run this same webserver in only AP mode?
Hi! Yes, it will be the topic of a future tutorial!
Hi Luca,
Great stuff and I applaud your efforts! However neither the standard web server example or SSL examples are working with the current releases of the ESP-IDF. The standard web server does not compile and results in an error:
C:/msys32/home/esp32/luca/14_basic_webserver/main/main.c:232:2: error: unknown type name ‘mdns_server_t’
mdns_server_t* mDNS = NULL;
The SSL Server compiles and I can connect to the SoftAP but trying to bring up the page in a browser results in a connection reset while trying to negotiate TLS. I tried https://192.168.10.1 as well as https://192.168.10.1/off.png just as a test. I tried in Chrome and Firefox and allowed for the invalid certificate in the browser settings.
Hi Erik, unfortunately Espressif changed all the methods for mDNS… I’m updating all my examples
Dear Luca,
Your tutorial is really great.
I have question, after web server connected with WIFI AP , it working well.
But if the AP turned off then turned on again, look like esp web server not working anymore (not reconnect to the AP)
I have to reset the esp32, then it comeback working again.
Can i do for automatic reconnect after AP off and then on?
Thank you in advance.
Woot
Hi, you have to manage the SYSTEM_EVENT_STA_DISCONNECTED event, see this example.
Hi Luca,
Thank you for all the great tutorials. I have a question. How are you able to run 5v relay from 3.3v pin without any additional changes. I am trying to run a 8 channel 5v relay, and though the LED lights up, the relay does not switch on.
Thanks
Raajesh
it probably depends on the sensitivity of the relay… but you should use 3.3V relays to be sure that they switch
Ciao Luca,
complimenti per i tutorials!! Grandissimo!
Hai qualche dritta cu come implementare un client udp?
ciao francesco, è abbastanza semplice, guarda l’esempio fornito dal framework… non ho mai fatto un tutorial perché non ho trovato una applicazione di utilizzo.
Buongiorno Luca e complimenti per tutti i tutorial. Ho iniziato a muovere i primi passi con l’esp32 grazie ai tuoi consigli!
Ora ho un problema, sono partito da questo tuo esempio di web server che ho importato in platformio e sono riuscito a farlo girare bene.
Pero’ le due PNG volevo spostarle, toglierle dal codice buildato, e metterle dentro il file system (SPIFFS).
Tramite platformio, ho insertito le due PNG dentro la cartellatta “data”, buildato e fatto l’upload dell’immagine dello SPIFFS contenente le due PNG.
Creata la partition table ( nvs, data, nvs, 0x9000, 0x6000,
phy_init, data, phy, 0xf000, 0x1000,
factory, app, factory, 0x10000, 1M,
storage, data, spiffs, 0x180000, 1M, )
e fin qui’ tutto ok, operazione che ho gia’ fatto molte altre volte…
Il problema arriva quando ho sostituito la tua send “netconn_write(conn, on_png_start, on_png_end – on_png_start, NETCONN_NOCOPY);” con il seguente codice che va ad aprire il file, manda l’header “HTTP 1.1 200 OK\r\n” e poi con un while faccio le send finche’ il file non e’ finito.
f = fopen(“/spiffs/on.png”, “r”);
if (f == NULL)
{
printf(“Failed to open file for writing”);
while(1);
return;
}
netconn_write(conn, http_png_hdr, sizeof(http_png_hdr) – 1, NETCONN_NOCOPY);
while(fgets(buffer, 500, f))
{
netconn_write(conn, buffer, 500, NETCONN_NOCOPY);
}
fclose (f);
Ora ti volevo chedere, secondo te e’ un problema dello SPIFFS che non riesce a leggere abbastanza velocemente dalla flash i circa 40Kb della png?
Freq dell’ esp32 240MHz
ciao Luca, se guardi il sorgente del mio progetto esp32lights vedrai come ho implementato qualcosa di analogo