
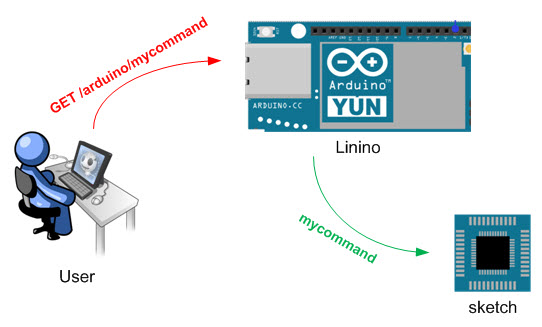
In my previous tutorial you learned how a sketch, running on the Arduino Yun’s ATMega chip, can execute processes (commands, scripts…) on Linino thanks to the Bridge library.
In this tutorial you’ll learn how to do the opposite: send commands from Linino to the sketch that runs on the microcontroller.
YunServer & YunClient
In my sketch I’ll use two objects from the Bridge library:
[checklist]
- YunServer, to listen for new incoming connections;
- YunClient, to send/receive data from the client that has connected.
[/checklist]
Yun offers an easy REST interface to directly interact with the YunServer object. Each web connection to an address like the following:
http://<yun_ip>/arduino/something
is passed to the sketch and, using the readString() method of the YunClient object, you can get the part of the URL that follows /arduino/ (in the example, the bold text).
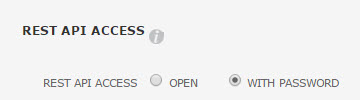
You can restrict the use of the REST interface configuring a password (the default is arduino) through the Yun’s web interface:
YunLedToggle
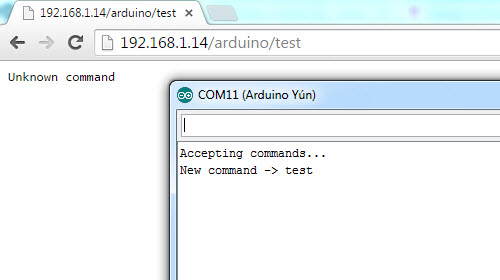
The sketch I developed for this example is available in my Github’s repository. Its goal is to change the status of a LED (to keep it simple I chose the onboard one, connected to PIN 13) when it receives the command toggle.
Within the setup() you need to initialize the Bridge library and make the YunServer listen for new connections (to increase the security, I configured it to accept connections only from localhost):
Bridge.begin(); [...] server.listenOnLocalhost(); server.begin(); |
In the loop() the method server.accept() blocks the sketch waiting for a new connection. When a client connects, a YunClient object is created and it will be used to transfer the data:
YunClient client = server.accept(); |
The command sent by the client is read and cleaned (trim) from any spaces:
String command = client.readString(); command.trim(); |
If the command is “toggle”, the LED status is changed:
if(command == "toggle") { digitalWrite(LED_PIN, !digitalRead(LED_PIN)); |
At the end, the client connection is closed:
client.stop(); |
You can test the sketch using a web browser:

callArduino
What I described above can also be used by PHP pages running on Linino to interact with a sketch.
I prepared a simple example (saved in my repository on Github) that explains the use of cURL, even if the REST interface is password protected:


Ciao, grazie mille del tutorial. Ho seguito tutto alla lettera ma quando digito myip/arduino/test appare questo messaggio: Could not connect to YunServer 146 Connection refused
Potresti aiutarmi?
ciao Marco, sembra che lo Yun non accetti le connessioni… prova a fare un PING per verificare se almeno è correttamente in rete
Ciao Luca,
grazie mille per la risposta. Ho effettuato il ping di yun e lo vede correttamente. Non è che ho sbagliato qualcosa nella procedura? Io ho messo il file php nella cartella /arduino/www/
Oltre a ciò ho solo reso statico l’indirizzo ip di yun perchè mi entrava sempre in confitto con la stampante..
Qualche idea?
ciao, ma se provi da browser web (senza php) funziona?
Ciao Luca, in realtà ho sempre provato da browser web.. Mi da quell’errore quando provo a connettermi da internet..
Marco per raggiungere lo Yun via internet devi configurare il tuo router per effettuare il NAT e dovrai puntare all’indirizzo IP pubblico, non al nome “yunserver” o simile…
Ciao Luca, per quanto riguarda la configurazione del router ho impostato le porte puntandole allo YUN con codifica HTTP (http://www.mauroalfieri.it/informatica/router-port-mapping.html) . per quanto riguarda l’indirizzo, mi da errore anche puntandolo dall’indirizzo pubblico come descritto in tua guida (http://www.lucadentella.it/2012/04/28/enc28j60-e-arduino-6/2/).
Qualche idea?