
The project I’m going to describe today it’s a sort of proof of concept that will demonstrate the possibility to remote control sensors and actuators (for example a couple of relays) via Telegram.
Telegram is an instant messaging application, similar to the famous Whatsapp. Last June, the Telegram developers announced that a new set of APIs were available to develop bots.

My idea was to develop a bot, running on my Raspberry Pi, that receives commands via Telegram chats. I connected to the Raspberry a temperature/humidity sensor and a module with two relays. Here’s a short video that describes the project:
How it works
The working of the bot is shown in the following diagram:
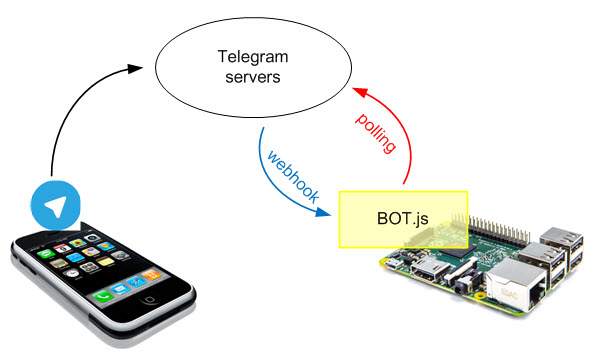
The user, through the Telegram app installed on his smartphone, starts a chat with the “bot” account; the messages are delivered to the Telegram servers. The program running on the Raspberry can get the messages in two ways:
- polling, every tot seconds the program verifies if there are new messages and fetches them
- webhook, the program configures Telegram to dispatch the new messages to a web URL
The second solution requires a public IP address (static or a dyndns service) and some configuration (NAT) on your Internet router, I therefore chose to implement the simpler polling.
Let’s create the bot
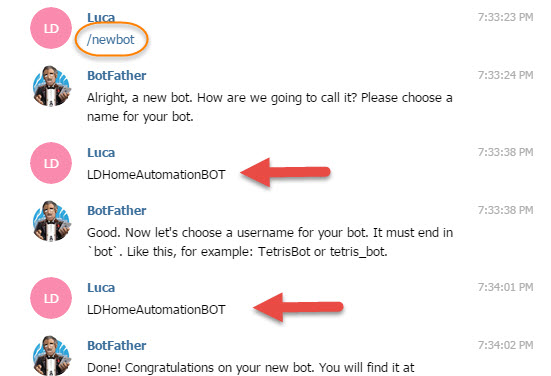
The first step in developing your own bot, is to create it in Telegram. You create new bots or configure existing ones sending the right commands to a “built-in” bot, the BotFather:

Start the process to create a new bot sending to the BotFather the command /newbot. You’ll be prompted for the name (display name) of your new bot and for its username. If the process is successful, you’ll receive an authorization token, that is the “password” you must specify in your program to “impersonate” the bot:
Installation
My bot was developed in javascript to be run withing the Node.js server environment (please refer to the great tutorial from Adafruit to install it on your Raspberry). The program needs 3 libraries:
[checklist]
- node-dht-sensor, to read the temperature and humidity values from a DHT11 sensor
- onoff, to control the Raspberry digital PINs
- node-telegram-bot, to use the Telegram APIs
[/checklist]
The library installation is super simple thanks to the NPM (Node Package Manager). Create a new folder to save the bot code and, within that folder, type the following command:
npm install node-dht-sensor onoff node-telegram-bot
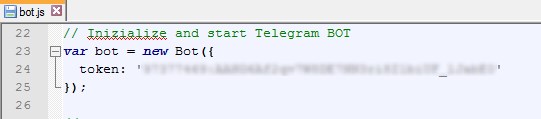
Copy in the same folder the bot’s javascript code, available in my Github repository. The code has a lot of comments and should be easy to understand: for any dubts feel free to add a comment to this post!
Remember to change the token in the code, typing the one generated by the BotFather for your bot:
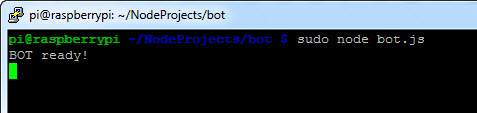
To run the bot, type:
sudo node bot.js
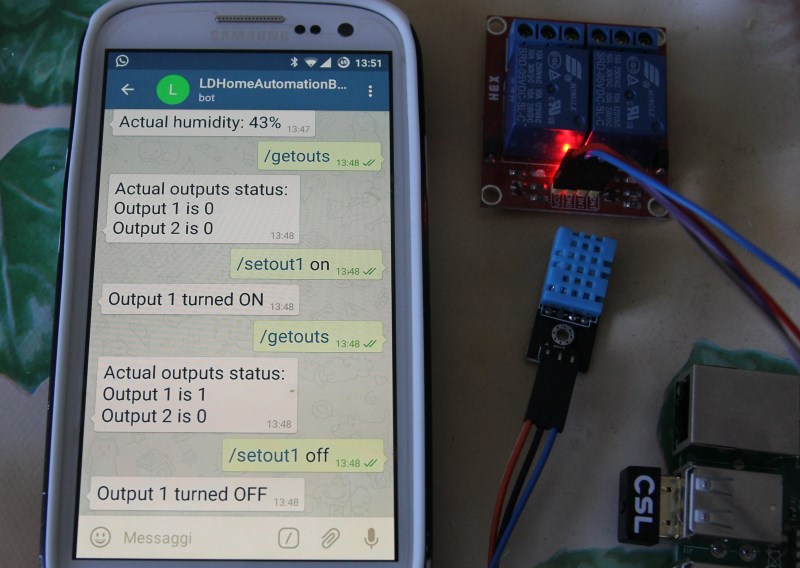
Usage
The available commands are:
[checklist]
- /getouts, shows the actual status of the two relays
- /setout1 ON|OFF, /setout2 ON|OFF, sets one of the two outputs to ON or OFF
- /gettemp, shows the actual temperature
- /gethum, shows the actual humidity
[/checklist]
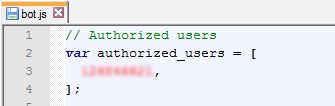
Security
Telegram bots are public, that means that every user can send messages to them. To be sure that my bot will answer only to me, I added in the code a check on the ID of the user that is sending commands to the bot:
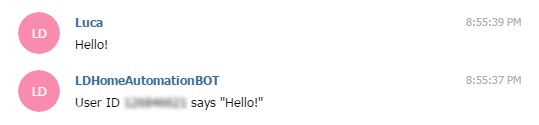
If you need to retrieve your Telegram ID, you can use a small bot, this too available on Github, that simply answer each message with the original one (echo) and the sender ID:
 Electronics
In my example, I used a DHT11 temperature/humidity sensor and a module with two relays. I connected the two elements to the expansion PINs of my Raspberry (1 PIN for the sensor and 2 for the relays, in addition to the power supply):


In the program, I configured the correct PIN numbers:

What’s next
The goal of this project was to demonstrate how it was possible to develop a bot that can receive commands via Telegram: it’s a starting point.
Telegram APIs offer a lot of advanced featured to explore, for example the ability to list the available commands, to change the bot’s avatar or to customize the app keyboard: in my example, when the user sends the /setout1 command, the bot may ask the desired status (ON|OFF) for that output customizing the app to show a keyboard with only two buttons, for the two possible choices.


Did you know that Openhab has this functionality as well? Someone made an addon for telegram interaction.
It might be not as much fun as doing it yourself, but you could give it a shot 😉
Hi, thanks I didn’t know the OpenHab project, very interesting!
for(i = 0; i < authorized_users.length; iè++)
nel tuo bog.js c'e' un errore alla linea 112, capita anche a me di premere 20 tasti consecutivamente con le ditone che mi ritrovo ;o)
grazie mille! lo sistemo subito 😉
Ciao Luca.
non ho capito se per installare telegram sul raspberry serve un altro numero di telefono, e se la creazione della bot va fatta sul raspberry.
puoi spiegarmi in stampatello per favore.
sono un po lento….
grazie.
Ciao Beppe, il bot “gira” su Raspberry: è un programmino che lanci (volendo puoi farlo partire non appena dai corrente al Raspberry). Per funzionare non ti serve un altro numero di telefono ma devi “registrare” il tuo bot come spiegato nell’articolo per ottenere da Telegram un “token” (un codice identificativo) che è simile al numero di telefono per gli utenti “veri”.
Ciao Luca, ho un po’ di confusione sulle librerie. Le hai scritte tu oppure fanno parte di un progetto che hai trovato per il Raspberry ? Dove le posso trovare ?
Mille grazie
Ciao Claudio, le librerie per Node.js si trovano qui: https://www.npmjs.com/
Gentilissimo, grazie.
Claudio
Ciao luca, quando provo ad installare le librerie mi da questi errori dove sbaglio?
npm install node-dht-sensor onoff node-telegram-bot \
> node-dht-sensor@0.0.8 install /home/pi/TelegramBot/node/node_modules/node-dht-sensor
> ./check-bcm2835
—————————————————————————-
Library BCM2835 not found!
Make sure you follow instructions at http://www.airspayce.com/mikem/bcm2835/
to install the BCM2835 library on your system.
—————————————————————————-
|[…]
Ciao! Come ti dice l’errore, ti mancano le librerie BCM2835 per Node, segui le istruzioni al link indicato
Ciao Luca, quando si tenta di installare la linea di NPM me il seguente errore mio raspbian getta, può essere? Sono bloccato qui per giorni
gyp ERR! stack Error: ENOSPC, mkdir ‘/home/pi/node_modules/node-dht-sensor/.node-gyp’
[…]
ciao! sembra un problema di permessi… davvero strano se lo lanci da root: puoi provare a partire con una immagine Raspbian “pulita”?
Consigli su qualche tutorial per imparare ad usare NODE.js ?
Grazie !
Ciao Stefano, io ho iniziato con questo: http://www.nodebeginner.org/
Ok, facendo qualche ricerca ho capito che ciò che hai scritto è per un comando seguito da on oppure off, ho capito come implementare il cambiamento di tastiera, si trova in send messagge quindi oltre chat id e text andrebbe scritto reply_markup:
e come argomento ci va direttamente un array di array contenente [[‘ON’][‘OFF’]]?
case message.text == “/testonoff”:
bot.sendMessage({
chat_id: message.chat.id,
text: ‘on o off?’, //test per tastiera
reply_markup: [[“ON”,”OFF”]],
});
break;
se è giusto, come riesco a indicare la condizione ad esempio if(replay_markup == ‘ON’) then ?
Grazie della disponibilità, mi saresti di grandissimo aiuto
Ciao Luigi, la tastiera personalizzata è solo lato “client”, quello che tu leggi in risposta è comunque il testo “ON” o “OFF”, il confronto va sempre fatto sulla variabile message.text
ciao Luca,complimenti per l ottima guida che hai scritto,trovo davvero molto interessante l utilizzo di telegram per comunicare con il piccolo raspberry.
Sono riuscito a far funzionare tutto subito grazie alle spiegazioni semplici ed efficaci …sono riuscito ad aggiungere al tuo bot(modificandolo) altre uscite per collegare dei relè aggiuntivi ….sarebbe interessante aggiungere la possibilita di ricevere in chat tramite un comando anche una foto scattata da una webcam o magari da un ip cam…. è da molto che sto cercando su internet qualche tutorial ma …zero.(nn sono un esperto in progr)
magari vista la tua esperienza potresti implementarlo in questo progetto …
Grazie ciao ciao
Ciao Daniele! ottimo suggerimento, mi metto al lavoro 😉
…Grande !!!
Ciao, complimenti per la guida!
Volevo chiederti se era possibile fare la stessa cosa con un sensore di temperatura differente, il DS18B20?
Per caso conosci qualche guida?
Grazie
Ciao! Assolutamente sì, devi solo cambiare il “modulo” che si interfaccia al sensore… ecco un tutorial
Grazie mille! ti faccio ancora una domanda: ho provato il tuo sorgente javascript sul mio raspberry e funziona perfettamente ma il problema è che dopo molte ore non risponde più ai comandi su telegram e sono costretto a riavviarlo. Secondo te quale potrebbe essere il problema?
Grazie
ma il bot resta attivo o si chiude/crasha?
Penso di aver capito il problema ma non so come risolverlo. Capita che la connessione internet cada per un tempo limitato e penso sia questo quello che faccia saltare tutto
i have problem with 1 line bot.js
pi@raspberrypi:~ $ sudo python ~/bot/bot.js
File “/home/pi/bot/bot.js”, line 1
// Authorized users, replace with your real IDs
^
SyntaxError: invalid syntax
Hi! you’re using the python interpreter while the code runs on node.js
now its work 😉
Hi Luca, I have problem
where i can get authorized user ?
Hi! Run the “userid.js” bot, you can download it from Github. When you write a command to the bot, it outputs on the console your user ID
Luca, Thanks for the tutorial. I am confused on the polling or webhook. Where is the loop or event polling the telegram server every 2 seconds in the bot.js listing? Or how this works?
Please let me know where can I find details . Thanks in advance !
Hi Jose, all the interaction between your bot and telegram is performed by the Bot library I’m using, no external code is required.
Luca Thanks a lot again. I’ve installed on RPI running ArchLinux and works perfect. Only problem the DHT module was not possible to install I’ve tried several times and on the middle of the install the RPI gets extremely slow and almost hungs and I must do hard reset. This is not an issue for me as I do not have that sensor, I will try using the npm for the DS18b20.
Concerning my previous question, then the polling seems to be the default as the script never mentioned it right ?
Salve trovo molto interessante il suo progetto.
Avrei una domanda, io non sono esperto, sarebbe possibile col bot BotFather, eseguire una operazione di conferma (positiva o negativa), ad una richiesta che arriva su un canale telegram, in cui si chiede di cliccare su SI o NO?
E fare eseguire tale operazione più volte al giorno, e solo quando in quel canale viene richiesta la conferma? In quanto dopo la conferma ritorna sempre un messaggio di sistema di accettazione avvenuta.
Salve Willy… dipende: se la richiesta è diretta ad un particolare utente no, un BOT non può sostituirsi all’utente. Se invece si tratta di inviare in un canale – a cui il bot è collegato – un messaggio in maniera periodica sì, è possibile.
Progetto molto interessante, non sono molto esperto ma ho visto che comandare 4 relè è molto semplice editando leggeremente il file. Volevo estendere il controllo a due sensori uno interno DHT 11 e uno esterno DHT 22 è possibile?
Grazie mille.
Ciao! Assolutamente sì, ti basta definire due variabili tipo SensorLib e inizializzarle correttamente (indicando il PIN a cui hai collegato i due sensori e il “modello”, quindi 11 e 22)
Hi, I was testing your code, it was working fine but then I don’t understand why I get this message everytime
home/pi/relaybot/node_modules/node-telegram-bot/lib/Bot.js:221
if (msg.message.text && msg.message.text.charAt(0) === ‘/’) {
hi, do you mean that you get an error/warning message on that line?
Ciao Luca complimenti, volevo chiederti non capisco come installare le librerie mi daresti un aiuto ne sarei felice grazie
Ciao Giuseppe, le librerie si installano semplicemente con il comando
npm install node-dht-sensor onoff node-telegram-botGrazie x la risposta rapida ho installato le librerie npm ho creato una cartella in /home/pi ed ho digitato nella cartella npm install node-dht-sensor onoff node-telegram-bot pero mi da degli errori nel installazione tutto da terminale ovviamente putty
ciao, quali errori ti da? Il tuo Raspberry è collegato ad Internet per scaricare i vari pacchetti?
si ho un Raspberry pi 3 è connesso riesce ad installare solo la libreria node-telegram-bot poi con le altre escono err in rosso con descrizione e gyp in rosso, ho seguito alla lettera la tua guida molto dettagliata ma niente dopo ci riprovo perchè sarebbe un peccato non riuscirci perchè mi piace
Ciao Luca cmq ho riprovato sle librerie node-telegram-bot onoff sono installate il problema è con
node-dht-sensor non riesce ad installarsi mi da molti errori non posso elecarti ci vorebbe piu spazio
Ciao Luca buone notizie sono riuscito ad installare il tutto è funziona il problema erano le librerie node,js e npm ho trovato un link dove ho fatto l’aggiornamento grazie fai nuovi progetti stiamo in attesa ciao.
Ciao, puoi dirmi come hai risolto? anche io ho il tuo stesso problema e vorrei risolvere.
Grazie mille
Ciao Luca,
complimenti per il sito, io invece sono più o meno neofita quindi prima di cimentarmi con il rischio di perdere tempo, vorrei sapere se è fattibile il bot di telegram che ho in mente.
In sostanza ho un sito internet (in realtà è fatto con wordpress) dove siamo in 5 amministratori, vorremmo la possibilità di poter sfruttare un bot telegram che permetta ai visitatori di scriverci da telegram in un gruppo dove siamo tutti e 5 presenti più il visitatore del momento.
A primo avviso si potrebbe pensare che basti un gruppo, ma in realtà non è possibile in quanto se i visitatori fossero più di uno, ognuno vedrebbe quello che scrive l’altro creando enorme confusione.
Il bot in sostanza dovrebbe poter esser sviluppato in due modi:
1- in modo che inoltri tutti i messaggi che il visitatore invia, ad un gruppo dove ci sono i 5 amministratori che rispondendo dal gruppo a sua volta i messaggi vengono inoltrati al visitatore in questione;
2- oppure in modo che crei ogni volta un nuovo gruppo telegram con i 5 amministratori più il visitatore in questione. Poi all’uscita del visitatore però il gruppo dovrebbe eliminarsi (anche se potremmo farlo manualmente ogni volta)
Vorrei sapere se in primis è fattibile e poi quale via più semplice mi consigliate di percorrere (ed il grado di difficoltà che ha).
Grazie infinite,
Enrico
Ciao Enrico, esistono già diverse soluzioni pronte, una che ho visto usata su diversi siti WordPress è ChatBro
Ciao Luca,
avevo già provato ChatBro e purtroppo fa quello che non volevo, crea un gruppo unico tra tutti i visitatori, noi 5 invece abbiamo bisogno che ogni visitatore non veda cosa scrivono gli altri, altrimenti si creerebbe troppa confusione.
provo ad inviare l’url direttamente da esp32, ma senza le librerie non funziona. ci sarebbe un modo?
esempio del mio invio
STRGMYSQL =”https://api.telegram.org/botMYTOKEN/sendmessage?chat_id=MYCHAT&text=test”
ClientMYSQL.print(String(“GET “) + STRGMYSQL + ” HTTP/1.0\r\n” + “Host: api.telegram.org\r\n” + “User-Agent: ESP32\r\n” + “Connection: close\r\n\r\n”);
ciao
ciao Andrea, sicuramente dovrai passare anche il token di autenticazione nella chiamata API (che non vedo nel tuo codice).