
After having learned how to connect your esp32 chip to a wifi network, today I’m going to show you how to send and receive data.
lwIP
The esp-idf framework includes the lwIP library to implement the TCP/IP stack protocol. This library, originally developed by Adam Dunkels and now maintained by a community of developers with an opensource license, is very used in the embedded world because of its small size and the many features it includes:
[checklist]
- it supports the most important protocols of the stack: IP, ICMP, UDP, TCP, IGMP, ARP, PPPoS, PPPoE
- it includes many clients: DHCP, DNS, SNMP…
- it offers different abstraction levels: raw API, sequential API and BSD-style API
[/checklist]

On the Internet you can find several resources (tutorials, manuals…) about this library. A well-written introduction document, even if not specific of the esp32 chip, is the one from Atmel: AT04055 – Using the lwIP Network Stack.
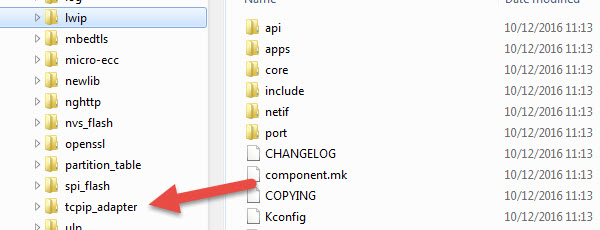
The lwIP library is located in the framework’s components/lwip folder. The connection between the core functions of the framework and the library is implemented in the tcpip_adapter code:
HTTP client
In this tutorial I’m going to show you a first, very simple, example of TCP communication: an HTTP client. The HTTP protocol (Hypertext Transfer Protocol) is the “language” websites speak; the HTTP client we’re going to develop will therefore act as an Internet browser:
- it opens a connection to a server that hosts a website
- it sends the request for a resource (HTML page, image…)
- it receives the response and prints it on the screen (via serial connection)

Let’s see the different steps in detail; the source code of the example is available in my repository on Github.
TCP connection
In the first step, the client connects, using the TCP protocol, to the server. A server can accept several incoming connections: to distinguish between the different services the server offers, the TCP protocol uses the concept of port, a number between 0 and 65535. Some services use standard ports: websites are normally “published” on port 80 (or 443 if they use the secure version of the protocol, HTTPS).
In your application, the connection to a remote server is represented by a socket: you can figure the socket as a “pipe” through which data is transferred.
After having configured the network adapter as you’ve already learned in the previous tutorial (in particular is the command tcpip_adapter_init() that initializes the lwIP library) you have to create a new socket:
const struct addrinfo hints = { .ai_family = AF_INET, .ai_socktype = SOCK_STREAM, }; int s = socket(res->ai_family, res->ai_socktype, 0); |
In this code, the socket s will use the TCP protocol (SOCK_STREAM) which belongs to the IP protocols “family” (AF_INET). The different protocols lwIP supports are defined in the sockets.h file:

The third parameter (that is 0 in the code above) is used to specify the ID of the protocol only if SOCK_RAW is used.
If the call has success, s contains the numeric id of the new socket. In case of error, -1 is returned.
After having created a socket, you can connect to the remote server using the function:
connect(int socket, const struct sockaddr *address, socklen_t size) |
function’s parameters are the socket id, the struct (sockaddr) that contains the information about the address of the remote server and the size of that struct
You usually know the name of the server, not its IP address. The conversion (= “resolution”) from name to address is performed by the DNS service (Domain Name System). You can use the getaddrinfo function to query the DNS servers:
struct addrinfo *res; int result = getaddrinfo(CONFIG_WEBSITE, "80", &hints, &res); |
If the resolution process has success, the res struct contains all the information required to perform the connection:
result = connect(s, res->ai_addr, res->ai_addrlen); |
HTTP request
When the connection is established, you can send to the server the request for the resource you want to retrieve. A simple HTTP request has the following syntax:
GET resource HTTP/1.1
Host: website
The request above used the GET method, specifies the path of the resource, the version of the protocol and the name of the website the resource belongs to (this is necessary if the server hosts different websites). Very important to know is that every HTTP request ends with an empty line.
For example, let’s use a page on my website that randomly returns an aphorism (I’ve already used that page in a tutorial about the enc28j60 chip):
 In the screenshot I underlined the name of the website and circled the path of the resource. The request you have to send to the server to fetch that page is therefore:
GET /demo/aphorisms.php HTTP/1.1
Host: www.lucadentella.it
In the example you can find on Github, I configured as parameters (via menuconfig) both the website and the resource. The constant string that contains the request is:
// HTTP request static const char *REQUEST = "GET "CONFIG_RESOURCE" HTTP/1.1\n" "Host: "CONFIG_WEBSITE"\n" "User-Agent: ESP32\n" "\n"; |
I added an additional, not compulsory, parameter: the User-Agent. Using that parameter, you can specify which application is sending the request (browser’s name, version…). The information is used by the target server for statistics but also sometimes to adapt the website to the capabilities of the program that will display it.
The function write is used to send the request to the server:
result = write(s, REQUEST, strlen(REQUEST)); |
Response
You can receive data from a socket using the read() function:
char recv_buf[100]; [...] do { bzero(recv_buf, sizeof(recv_buf)); r = read(s, recv_buf, sizeof(recv_buf) - 1); for(int i = 0; i < r; i++) { putchar(recv_buf[i]); } } while(r > 0); |
The function reads – if available – data from the socket, stores it in the buffer you specified as a parameter and returns the number of bytes retrieved.
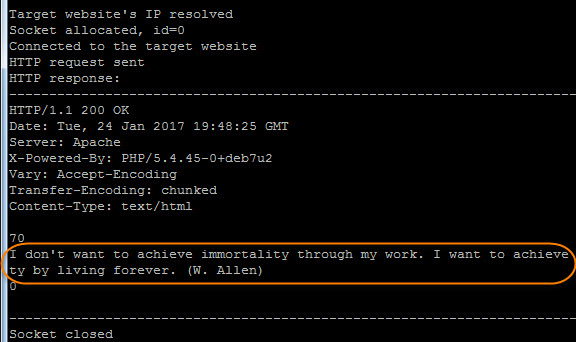
Demo
Here’s a screenshot of the example in execution:


Ciao Luca,
innanzitutto complimenti per l’ottimo blog, chiaro ed esaustivo.
Ti chiedo un aiuto, è da poco che “gioco” con la ESP32. Devo realizzare una connessione peer-to-peer tra due ESP32 usando wifi o bluetooth, il requisito che è si scambino dei semplici comandi (es. “comando1”, “comando2” ecc.) con un tempo di attivazione molto ridotto, poche decine di millisecondi, da quando quella denominata master riceve un input da GPIO.
Qual è la soluzione migliore? Hai un esempio di aiuto?
Grazie
Ciao Omar e grazie per i complimenti, fanno sempre piacere 😉 Per la tua applicazione vanno bene entrambi i protocolli… penso che l’uso del wifi sia più semplice (niente pairing…). Sto preparando proprio un tutorial sull’uso delle netconn API di lwip per connessioni socket e un altro sulla modalità Access Point di ESP32 che ti saranno sicuramente utili 😉
Ottima notizia! Spero di leggerlo presto allora.
Lo pubblicherai sul blog e su Github?
Grazie
sicuramente 😉 nelle prossime settimane
Ciao Luca,
Adoro i tuoi tutorial!!
Solo ho qualche piccolo problemino con questo programma…
Ho provato con google e con il tuo sito demo degli aforismi, ma continua a darmi “Unable to connect to the target website”
Inoltre ho dovuto disattivare il brownout sensor perché continuava a resettarsi, ma immagino questo sia un problema della scheda xD
Thanks Luca for your tutors,
got request errors till I added some \r
static const char *REQUEST = “GET “WEB_RESOURCE” HTTP/1.1\r\n”
“Host: “WEB_SITE”\r\n”
“User-Agent: ESP32\r\n”
“\r\n”;
Thanks Marius, you’re right: HTTP specs require \r\n but some servers also accept \n.
Thanks for your tutorials, I hope you will continue writing them for a long time.
The first flashing of this tutorial gave me a panic error. Looking in tutorial 02 I noticed that there were a NVS initialization. That solved the panic error.
Also I got Bad Request until I changed \n for \r\n.
ciao Luca,
Grazie per i tuoi tutorial!! sono un beginer con l hardware. vorrei stabilire una connessione wifi tra il mio pc e esp32 per trasferire dati ( wifi scanner ) raccolti dal esp32 collegando il mio esp32 direttamente sulla presa ( non sul pc). ho provato di usare il tutorial 8 ma mi sono perso.
grazie in anticipo per una soluzione.
Ciao Briand… prova a vedere se il tutorial su mqtt fa al caso tuo!
I had to add “ESP_ERROR_CHECK(nvs_flash_init());”
to make it work. Thanks for the amazing tutorial !
Hello, When will you cover Websockets