
PlatformIO is an opensource ecosystem (as it’s defined in the homepage of the project) to develop IoT projects.
The heart of the platform is a software component named PlatformIO Core. This component includes:
[checklist]
- a cross-platform compiler
- a libraries and dependences manager
- a serial monitor
[/checklist]
PlatformIO Core is developed in Python and therefore it can run on different operating systems (Windows, Linux, MacOS).
Although you can use the Core component directly, PlatformIO’s strength lies in its IDE, which allows the development of multi-platform projects and integrates with the Core itself.
In this article I’m going to show you how to use PlatformIO to develop projects running on the esp32 chip.
Installation
PlatformIO IDE is provided as a plugin for two different development tools: Atom and VisualStudio Code. I tried both solutions and I preferred VSCode: both the installation and the use are simpler and more immediate.
Install VSCode after having downloaded the package from Microsoft’s website (the installer is available for Windows, Linux and MacOS).
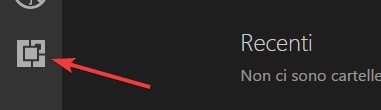
Open the Package Manager:
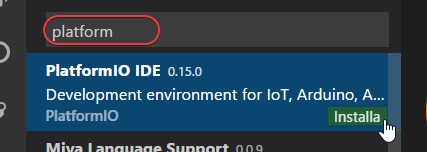
search the PlatformIO IDE package, then click on Install:
wait until the installation is complete:

Hello world
Now it’s time to develop your first program, which traditionally will display the sentence Hello world! on the terminal.
If it doesn’t show up automatically, open the PlatformIO’s homepage:

then click on New Project:

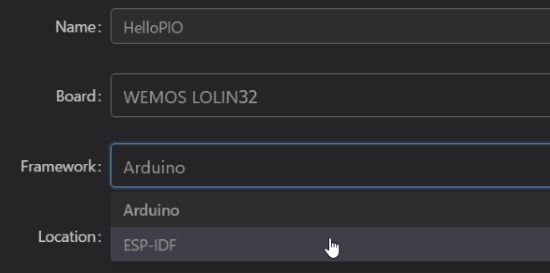
give a name to the project and choose a devboard based on the esp32 chip (in this example I’ll use a Lolin32 board by Wemos). PlatformIO supports both the esp-idf framework and the arduino-esp32 one. All my tutorials are based on the first one:
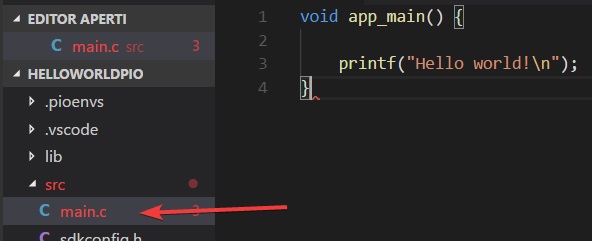
PlatformIO automatically creates some folders for your project. Choose the src folder (it stands for source, that is the folder which will contain the source code) and create a new file:

name the file main.c and type the simple program as it follows:
run the compiler by clicking on the corresponding button in the bottom bar:

the editor displays an error… indeed your code is using the printf() function without having included the library:
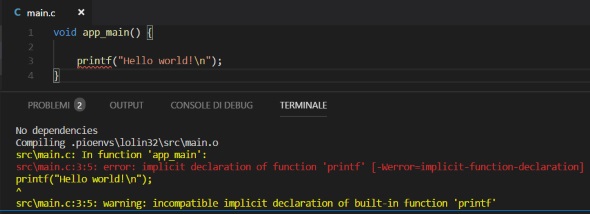
add the missing line, now you should be able to complile the code without errors:

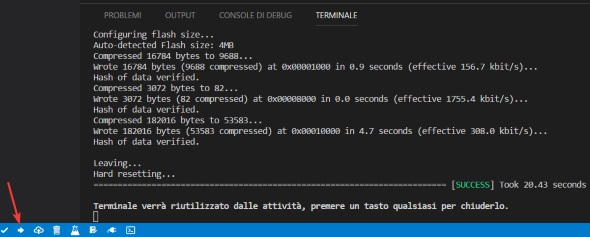
PlatformIO can also upload the compiled program to your board. Thanks to its auto-detect feature, you usually don’t need to specify the serial port the board is connected to:
Serial monitor
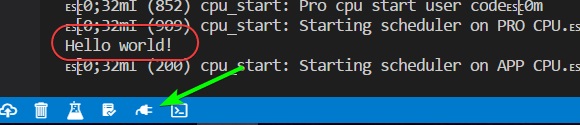
PlatformIO also includes a serial monitor you can use to test your program. By default, this monitor connects to the serial port with a speed of 9600 baud. The esp32 chip instead has a default speed of 115200 baud; you have therefore to change the platformio.ini file included in your folder as it follows:

Now open the serial monitor; you should see the correct output of your program:
Conclusions
I found the use of PlatformIO really immediate: after a few minutes I was able to develop, compile, load and test a program. Try it and leave a comment with your impressions!


Ciao, grazie e complimenti per gli articoli, sempre molto interessanti.
Ho provato con un modulo ESP-wroom-32, ma ci ha messo ben 135 secondi per compilare queste 3 righe di codice, e non 12 come vedo nel tuo caso, ogni volta ricompilato una lunga sequela di file che non so spiegarmi, se vuoi ti posto il log di compilazione, però è molto lungo. Quale potrebbe essere il motivo ?
Poi ho caricato il codice sulla scheda, e questo è l’output sul terminale “Attività – Monitor” :
> Executing task: C:\Users\User\.platformio\penv\Scripts\platformio.exe device monitor <
— Miniterm on COM10 115200,8,N,1 —
— Quit: Ctrl+C | Menu: Ctrl+T | Help: Ctrl+T followed by Ctrl+H —
2016 00:22B��J␂␒���� SPI Mode : DIO␛[0m
␛[0;32mI (89) boot: SPI Flash Size : 4MB␛[0m
␛[0;32mI (102) boot: Partition Table:␛[0m
␛[0;32mI (113) boot: ## Label Usage Type ST Offset Length␛[0m
␛[0;32mI (136) boot: 0 nvs WiFi data 01 02 00009000 00006000␛[0m
␛[0;32mI (159) boot: 1 phy_init RF data 01 01 0000f000 00001000␛[0m
␛[0;32mI (182) boot: 2 factory factory app 00 00 00010000 00100000␛[0m
␛[0;32mI (206) boot: End of partition table␛[0m
␛[0;32mI (219) boot: Disabling RNG early entropy source…␛[0m
␛[0;32mI (236) boot: Loading app partition at offset 00010000␛[0m
␛[0;32mI (509) boot: segment 0: paddr=0x00010018 vaddr=0x3ffc0000 size=0x01b98 ( 7064) load␛[0m
␛[0;32mI (513) boot: segment 1: paddr=0x00011bb8 vaddr=0x40080000 size=0x00400 ( 1024) load␛[0m
␛[0;32mI (527) boot: segment 2: paddr=0x00011fc0 vaddr=0x40080400 size=0x0714c ( 29004) load␛[0m
␛[0;32mI (567) boot: segment 3: paddr=0x00019114 vaddr=0x400c0000 size=0x00000 ( 0) load␛[0m
␛[0;32mI (579) boot: segment 4: paddr=0x0001911c vaddr=0x00000000 size=0x06ee4 ( 28388) ␛[0m
␛[0;32mI (604) boot: segment 5: paddr=0x00020008 vaddr=0x3f400010 size=0x02d34 ( 11572) map␛[0m
␛[0;32mI (630) boot: segment 6: paddr=0x00022d44 vaddr=0x00000000 size=0x0d2c4 ( 53956) ␛[0m
␛[0;32mI (655) boot: segment 7: paddr=0x00030010 vaddr=0x400d0018 size=0x0c6b8 ( 50872) map␛[0m
␛[0;32mI (681) cpu_start: Pro cpu up.␛[0m
␛[0;32mI (692) cpu_start: Starting app cpu, entry point is 0x40080cf8␛[0m
␛[0;32mI (0) cpu_start: App cpu up.␛[0m
␛[0;32mI (725) heap_alloc_caps: Initializing. RAM available for dynamic allocation:␛[0m
␛[0;32mI (747) heap_alloc_caps: At 3FFAFF10 len 000000F0 (0 KiB): DRAM␛[0m
␛[0;32mI (767) heap_alloc_caps: At 3FFC2350 len 0001DCB0 (119 KiB): DRAM␛[0m
␛[0;32mI (788) heap_alloc_caps: At 3FFE0440 len 00003BC0 (14 KiB): D/IRAM␛[0m
␛[0;32mI (809) heap_alloc_caps: At 3FFE4350 len 0001BCB0 (111 KiB): D/IRAM␛[0m
␛[0;32mI (831) heap_alloc_caps: At 4008754C len 00018AB4 (98 KiB): IRAM␛[0m
␛[0;32mI (851) cpu_start: Pro cpu start user code␛[0m
␛[0;32mI (908) cpu_start: Starting scheduler on PRO CPU.␛[0m
Hello World!
␛[0;32mI (200) cpu_start: Starting scheduler on APP CPU.␛[0m
è normale che sia così ? Non si possono eleimnare tutte le righe che non c'entrano con l'utput che mi aspetto ?
Cordiali saluti.
Ciao Samuele. Per velocizzare la compilazione lancia “make -j4”. L’output che vedi è quello del bootloader, tramite menuconfig puoi “silenziarlo”
Grazie mille per l’articolo! non conoscevo platformio e devo dire che è molto meglio dell’IDE base di Arduino.
grazie 🙂
grazie a te Lorenzo per il commento! Ormai PlatformIO è diventato il mio IDE di riferimento…
Ciao Luca,
ho provato PlatformIO e devo dire che la prima sensazione è davvero positiva.
Mi chiedevo tuttavia se mi potevi gentilmente indicare qualche link per poter comprendere come “importare” progetti già sviluppati secondo il framework esp-idf.
Ad esempio:
– come si mappa il Kconfig.projbuild in PlatformIO?
– Si usa ancora il make menu-config, per impostare i vari parametri di customizzazione che il framework esp-idf mette a disposizione?
– Riferendomi ad uno dei tuoi esempi (i.e. ESP32 (20) – Webserver) come si implementa ora l’embedding binary data (in component.mk)?
– Come si implementa ora l’utilizzo del componente spiffs di Boris Lovosevic (loboris) che hai utilizzato nel tuo tutorial ESP32 (22) – SPIFFS?
Inoltre mi sapresti dire se Platformio è allineato all’ultima versione del esp-idf? Ho notato che alcuni componenti (Es: mdns) sono cambiati ad una certa release di esp-idf. Sarebbe bello capire dunque anche il grado di l’utilizzabilità della documentazione aggiornata del framework esp-idf in PlatformIO.
Grazie mille!
Ciao Claudio, poi hai trovato risposta alle tue domande? Interessavano anche a me.
Purtroppo no. Tu hai avuto più fortuna?
Hi, I’m currently working on a project with ESP-IDF and Eclipse, I tryed migrating to plataformIO but it did not compile… is there a way to painlessly do this?
Hi! Which errors do you get?
Ciao Luca, ho seguito passo passo le tue indicazioni ma nell’output seriale non ho il tanto sperato “Hello World!” quale potrebbe essere il motivo? Grazie Marco
— Miniterm on COM3 115200,8,N,1 —
— Quit: Ctrl+C | Menu: Ctrl+T | Help: Ctrl+T followed by Ctrl+H —
en:12488
entry 0x40078f␂␂␂�␙�data 01 01 0000f000 00001000␛[0m
␛[0;32mI (71) boot: 2 factory factory app 00 00 00010000 00100000␛[0m
␛[0;32mI (78) boot: End of partition table␛[0m
␛[0;32mI (82) esp_image: segment 0: paddr=0x00010020 vaddr=0x3f400020 size=0x04aa8 ( 19112) map␛[0m
␛[0;32mI (98) esp_image: segment 1: paddr=0x00014ad0 vaddr=0x3ffc0000 size=0x01eec ( 7916) load␛[0m
␛[0;32mI (103) esp_image: segment 2: paddr=0x000169c4 vaddr=0x40080000 size=0x00400 ( 1024) load␛[0m
␛[0;32mI (109) esp_image: segment 3: paddr=0x00016dcc vaddr=0x40080400 size=0x075e8 ( 30184) load␛[0m
␛[0;32mI (130) esp_image: segment 4: paddr=0x0001e3bc vaddr=0x400c0000 size=0x00000 ( 0) load␛[0m
␛[0;32mI (130) esp_image: segment 5: paddr=0x0001e3c4 vaddr=0x00000000 size=0x01c4c ( 7244) ␛[0m
␛[0;32mI (140) esp_image: segment 6: paddr=0x00020018 vaddr=0x400d0018 size=0x12bc4 ( 76740) map␛[0m
␛[0;32mI (178) boot: Loaded app from partition at offset 0x10000␛[0m
␛[0;32mI (178) boot: Disabling RNG early entropy source…␛[0m
␛[0;32mI (178) cpu_start: Pro cpu up.␛[0m
␛[0;32mI (182) cpu_start: Starting app cpu, entry point is 0x40080e30␛[0m
␛[0;32mI (0) cpu_start: App cpu up.␛[0m
␛[0;32mI (193) heap_init: Initializing. RAM available for dynamic allocation:␛[0m
␛[0;32mI (199) heap_init: At 3FFAFF10 len 000000F0 (0 KiB): DRAM␛[0m
␛[0;32mI (205) heap_init: At 3FFC26F8 len 0001D908 (118 KiB): DRAM␛[0m
␛[0;32mI (212) heap_init: At 3FFE0440 len 00003BC0 (14 KiB): D/IRAM␛[0m
␛[0;32mI (218) heap_init: At 3FFE4350 len 0001BCB0 (111 KiB): D/IRAM␛[0m
␛[0;32mI (224) heap_init: At 400879E8 len 00018618 (97 KiB): IRAM␛[0m
␛[0;32mI (231) cpu_start: Pro cpu start user code␛[0m
␛[0;32mI (249) cpu_start: Starting scheduler on PRO CPU.␛[0m
␛[0;32mI (0) cpu_start: Starting scheduler on APP CPU.␛[0m
Ciao Marco… l’output si ferma a quella riga? Strano, sembra tutto ok…
Si, non c’è altro dopo.
Mi sembra che anche gli altri log finiscano come il mio tranne che per la riga “Hello World”.
Una cosa che devo fare con la mia scheda ESP32 è premere il pulsante BOOT quando devo fare l’upload altrimenti ho un errore sulla seriale.
Per ora lavoro con l’arduino ide li ho visto che gli esempi girano correttamente
Hello Luca. I would like to consult you if all your tutorials are exclusively for the Wemos Lolin 32 card. I currently have an ESP-WROOM-32 WiFi / Bluetooth Classic / BLE card, but I do not know if it is compatible with your tutorials or I need to acquire another card, but this time a Lolin 32 compatible with PlatformIO?
Hi Manuel, my tutorials are “generic”, they can be applied to almost all the dev boards based on the esp32 chip