
After having brought a Raspberry Pi Zero, I asked myself how to access it and do some initial configuration because of in that moment I hadn’t an HDMI monitor or an USB keyboard and a mouse.
Fortunately, this Raspberry model supports USB OTG (On The Go): it can “become” a slave USB device such as a storage device, a HID peripheral or even a webcam. Today I’ll show you how to configure a Raspberry Pi Zero so that it will be identified by a PC as a network interface: we’ll be therefore able to connect to it via SSH using a simple USB connection.
More importantly, we’ll be able to do all the configuration steps working directly on the SD card, without the need to connect the Raspberry to external peripherals (monitor, keyboard…).
Configuration
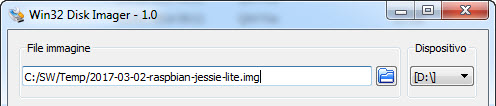
First, install (flash) on an SD card a recent version of the Raspbian distribution. My PC runs Windows, so I uses Win32 Disk Imager:
When the process completes, view the SD card content and open with a text editor the config.txt file:

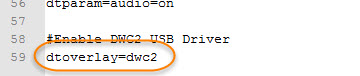
Add at the end of the file the line dtoverlay=dwc2 (if you want, you can also add a comment as in the screenshot below):
Now open the file cmdline.txt. Locate the word rootwait and immediately after it add modules-load=dwc2,g_ether. Pay special attention to the white spaces, see the screenshot:

The final step is to create an empty file, named ssh (without extension!), to enable the sshd server:

The configuration is complete: now insert the SD card into your Raspberry, power it on and wait some seconds until the boot process ends. If you now connect the Raspberry to your PC, this should identify it as an RNDIS/Ethernet Gadget.
Driver installation
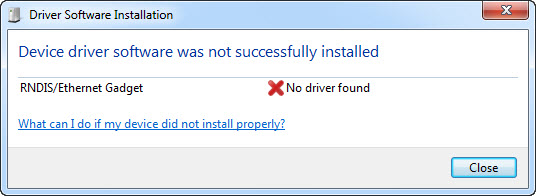
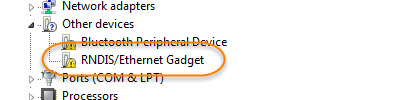
On some PCs it may happen that the peripheral is not automatically identified:
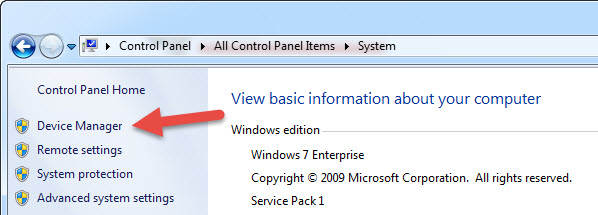
In this case, open the Device Manager from the Control Panel:
You’ll find the new peripheral under Other devices. Double click on it:
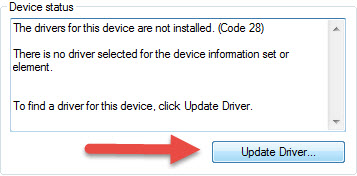
Open the Driver tab and click on Update Driver…:
Choose Browse my compiter…:

Then Let me pick from a list…:

Now choose Microsoft Corporation as Manufacturer and you can finally find the correct driver:

Connection
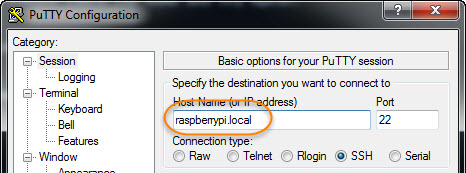
Thanks to the RNDIS driver, we can connect to the Raspberry Pi Zero as we were in a local network. Open an SSH client (I normally use PuTTY) and type raspberrypi.local as target hostname:
If the connection fails with an unknown host error, it means that your PC doesn’t support the mDNS (Multicast DNS) service. If your operating system is Windows, you can install the Bonjour service by Apple, while under Linux it’s available the Avahi daemon.
Internet sharing
Using the connection you’ve just set up, you can also share with the Raspberry your Internet connection.
Open the network connections of your computer and right click on your “main” connection (the one that provides you Internet access). Choose Properties, then open the Sharing tab and click on Allow other network users… In the combobox, select the network connection between your PC and the Raspberry Pi Zero:

Now verify that your Raspberry Pi Zero too can reach Internet addresses:


This is great! I also needed to configure my Pi Zero W without a monitor, keyboard, etc. but I solved it a slightly different way: https://davidgs.com/2017/accessing-your-raspberry-pi-zero-w/
Hi David, nice solution if your Raspberry has wifi connectivity! Thanks for sharing