
In one of the first posts of this tutorial, I wrote about the bootloader and about how the flash memory is organized. That article says:
This allows to implement an over-the-air (OTA) application update process: you send the new version of your application to the esp32 chip; the version is stored in a new app partition
There are different ways to implement OTA updates for your application… today I’ll show you how to do it in an easy way, thanks to a cloud service named Freshen.
Freshen
Freshen is an IoT backend, that is a cloud dashboard (published on the Internet) to manage IoT devices.
After having connected your devices to Frashen (I’ll show you later how to do it) you can:
[checklist]
- display the list of the devices and their status
- send a command to a device
- manage the files stored in a device
- update the firmware over-the-air (OTA)
[/checklist]
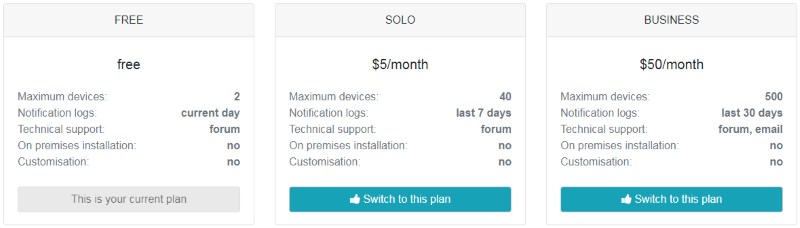
Freshen is developed by Cesanta, the company that also develops the Mongoose library and the MongooseOS, very used in the embedded world and compatible with the esp32 chip. The service has different fees, including a free one:
To use Freshen, first you have to register, using your Github or Google account:

Client library
Cesanta offers a client library you can use to connect your IoT project based on the esp32 chip to Freshen. The library consists only in a header file (freshen.h), and is available on the official site.
The library is fully compatible with the esp-idf framework and supports all the functionalities of the dashboard:

It’s also very easy to use. First copy the freshen.h file in the main folder of your project:

Then include the file in your program:
#include "freshen.h" |
To let the library communicate with the Freshen platform in the cloud, in your program you have to periodically call the freshen_loop() function:
You can do it in a dedicated task:
void freshen_task(void *pvParameter) { while(1) { freshen_loop(FIRMWARE_VERSION, ACCESS_TOKEN); vTaskDelay(2000 / portTICK_RATE_MS); } } |
This task calls the function every 2 seconds. Create the task in your app_main() with:
// start the freshen update task xTaskCreate(&freshen_task, "freshen_task", 10000, NULL, 5, NULL); |
The freshen_loop() function requires two parameters: the firmware version (it’s a text string at your choice, for example “v1.0”) and the access token, a code that is generated by the platform when you register a device.
Connect to the dashboard and click on Add new device:

A new device will be added (My Device #n). You can click on its name to display the details.
The access token is hidden… Click on click to copy to save it in the clipboard on your computer; you can then paste it in your program:

The device details page also allows to change the name of your device.
If you run the example program (you can download it from my Github repository) you’ll notice that, after a couple of seconds, the status of your device changes to online, to indicate that it’s correctly sending data to the dashboard:

In the details page, you can now list the functions that you can remotely call:

For example, if you call the Sys.GetInfo function you can retrieve the information about firmware version, architecture, compile date…:

OTA
To be able to update the firmware of your device over the air, you have to select an appropriate partition layout. For example you can choose the “OTA” layout that is already included in the framework:

Let’s now modify the firmware version, to be “1.1”:

then compile the program but don’t use the flash command. Note the path of the binary (compiled) file:

Select your device in the dashboard and click on OTA update selected:

Choose the .bin file that contains the new version of your firmware.
After a few moments, you’ll probably see the device going offline and return online. If the update process was successful, call the Sys.GetInfo function again and you’ll see the new version:


Hi Luca, great content, thank you! Do you know if freshen.cc service closed?
Hi, apparently they moved the dashboard to: https://dash.mongoose-os.com/